Archive for ‘Flower Gardening’

July 30, 2013

How To Keep Your (Old-Fashioned) Petunias Lush and Blooming All Summer Long

Petunias, ya either love ’em or hate ’em.  When I was a kid petunias were big flowers offered in a handful of colors: red, white, purple and pink, or at least that’s what I remember.  My mom used to plant them in our window box on the front of our house every year.  I remember watching them grow from little mounds of color to flowers overflowing from the box later in the summer.

For me, petunias have a bit of nostalgia.  Add the lovely scent of the grandiflora petunias (the big flowers, reminiscent of a twirling gown) to the childhood memories and petunias do a little tugging on my heart-strings.  But petunias get a bad rap in many parts of the green (as in plant) industry.  They complain that they get long and scraggly if you don’t prune them.  They get seed pods and tiny seeds all over and they “burn out” in the summer.  For many they just aren’t cool enough.  So people have been working to perfect the petunia, because, well a lot of people love petunias.  So they came up with newer versions: along came plants that didn’t require pruning, flowers of any size from large to tiny and loads of new colors, but something was lost along the way: that sweet summer scent.

Are there some fun, new petunias?  Sure.  Can you match them to your garden or home decor?  Practically.  And while I like those just fine, there’s something to be said for the “old-fashioned” large blossomed, sweetly scented petunia.  And if you love them, or even just kind of like them, here is a super simple tip on keeping your old-fashioned (grandiflora) petunias lush and blooming all summer long.

Petunias grow and bloom from the base of the plant out toward the end of the stem.  As petunias continue to grow and bloom the plant is busy working behind the scenes on setting seed so it can complete its life cycle (die).  If petunias are left to just take their natural course, they will continue blooming at the tip of the stem, but the rest of the plant will look long, spindly and frankly pretty ratty.  That will go on until the plant decides it has set enough seed to be able to have at least one plant grow up and continue the family name, in which case it will then die.  However, if you were, instead, to prune off the spent blossoms (those that have finished) all the way back to the stem, another set of leaves and blossoms will be ready and waiting to take their turn filling out and blooming, leaving you with a full, lush blooming plant.  Let’s take a peak as to how to do this, shall we?
IMAG4864

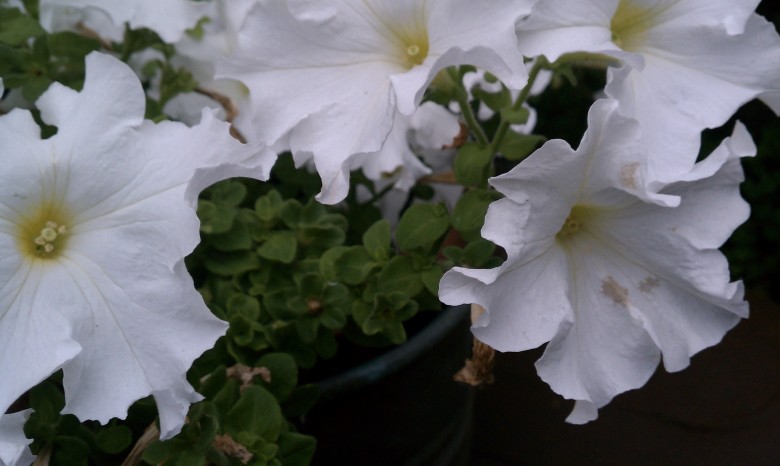
Here we see our lovely petunia with her large ruffled flowers.  Behind those flowers you can see tan-colored spent blossoms, about to drop.  And if you look further behind, you’ll see a slightly shiny, tan, conical-shaped seed pod.


Prune Here

Here we are a little closer.  We snuck behind the blossoms so you can see what we are about to prune.  In this picture you can see two spent blossoms, one mature seed pod and one seed pod just starting to emerge from a blossom that has recently fallen off.  We will pinch or prune these back to the stem with a small (bypass) pruners or even just our fingernails.  You will find that pruning petunias is sticky business.  Nothing too repulsive, but it will leave your fingers a bit tacky.


Pruned Stem

This is our pruned stem.  Notice that the old blossoms and seed pods have been removed exposing the new set of leaves and buds to begin blooming.  Keep on top of this throughout the season and you will have lush petunias all summer long.

But wait!  What if your plant is already long and leggy?  Is it too late?  Not at all.  In this case you would want to cut the main stem back about a third (or so) to force the plant to fill out instead of continuing to get longer.  The down side of this is that your plant will appear to have gotten a haircut for a while and won’t have blossoms on it for a couple of weeks while it puts its energy back into green growth and new buds, but the upside is that you will have lovely petunias again in a couple of weeks.  If you don’t have the heart to chop back the entire plant at once or you want to sneak in the pruning, you could always do it in stages by trimming a few stems one week, a few stems the next week and so on.  If, however, we were were nearing the end of summer, the plant had gotten really leggy and the side stems, where the blossoms once sat, look and feel more like dead twigs than a green plant, and if the seed pods have all dried and popped open, then the plant has probably already reached the point of no return, in which case pruning may be ineffective.

But summer is nowhere near over yet, so get out there and pinch those petunias!  And while you’re at it, don’t forget to stop and smell the… blossoms of course!

Kate

September 22, 2012

Cover Up!

Veggies, tender annuals and herbs, take cover!  Fall is here in full force in the Twin Cities and freeze warnings are in effect for tonight.

Protect any plants you want to keep by covering them with sheets or light blankets because next week is supposed to be beautiful, sunny and warm.

Don’t forget to remove the covers tomorrow morning once the chill has left the air so your plants get sun exposure and ventilation.

Keep those gardens going. Our season isn’t over yet!

Kate

April 17, 2012

M is for Monticello

If you live in the Twin Cities, or once resided somewhere in Minnesota, you may think this post is referring to Monticello, MN.  For those of you who were hoping that is the case, my apologies.  For the rest of you, I’ll continue on.

As a gardener, designer, what have you, every time I begin a project, whether it be at home or a project for a client, I’ll seek inspiration.  Sometimes it’s a plant, or a tree.  Sometimes it’s a detail on their home.  Sometimes it’s a place they’ve traveled.  Sometimes it’s nature.  There are many, many things that can be my source of inspiration, but when I’m looking for some inspiration for myself, I often turn back to a place I visited a number of years ago, Thomas Jefferson’s Monticello.  Now, some of you may recall I did a post about Monticello, or rather part of a post about Monticello in my History, gardening and experiments post about a year ago, but Monticello made such an impact on me I figured it was worth visiting again.

What’s so special about that place?  Well, what’s not to love? Ive you’ve ever been to the East Coast, or “down South” for that matter, I’m sure you’ve visited at least one or two plantations.  And while many of them are similar, at least to me, Monticello was different.  Sure, they have the huge estate, the enormous tree lined drive and massive spans of lawn, but at Monticello there’s something more.  Gardens.  Amazing gardens.

Now, I’m going to stop for a moment.  I don’t want to go any further without acknowledging what took place back in the time Thomas Jefferson was at Monticello.  That was a time of slavery.  I also don’t want to ignore the fact that Jefferson had slaves, because he did. Many of them.  And this plantation, like all the other plantations at that time would not have existed had it not been for the slaves who took care of them.  So while I wish slavery had never existed, I’m also very grateful for the slaves Thomas Jefferson had, because had it not been for them, the gardens I fell in love with would also not have existed.  So to the slaves, and the descendents of the slaves, I thank you.

So what about Monticello is so amazing?  Let’s see, where to begin? Let me start by saying this is a gardener’s paradise.  Whether you like annuals, perennials, fruit trees or veggies, it’s there.  And do you like heirlooms?  They have heirlooms, not only veggie heirlooms, but how about roses dating back to the 1400s?  They even have the Thomas Jefferson Center for Historic Plants!

What else?  Okay, Thomas Jefferson was a gardener himself.  And what I mean by that, is that he tried, experimented, tried again.  He planned the estate with curving pathways and flower gardens.  He created micro-climates by installing terraces on the South side of the hill to plant a veggie garden, and orchards with apples and apricots, peaches and pears, pomegranates, cherries, plums, nectarines, even almonds and olive trees.  And there’s Mulberry Row.  Many people pull mulberries thinking of them as “weed trees”.  Not Jefferson.  He planted them intentionally.  You’ve never seen Mulberry Trees look so stately.  And why not? The berries are wonderful! (Add that to your edible landscape.)  And the vineyards, yes he had two.  Okay, okay.  I know I get excited, but this all happened in the 1700s!  And what’s equally cool is that many of his plans, meaning, yes, sketches of the grounds, still exist.

Now, granted, the original plants are not there, but they began restoring the gardens in the 1980s to bring them back to what was once there.  Not to mention, heirloom seeds and plants are not only used on site, but also available for purchase if you have the inkling to do so.

There are so many things about Monticello that I love.  Oh, and not just outside either, of course Jefferson had amazing tropicals growing indoors as well.  If you want to take a peak, catch a little history and get a little inspiration, the folks at Monticello have done an amazing job on their website and have also created the Monticello Explorer, which lets you take a little tour from your desktop so you can catch a glimpse of this amazing estate.  There are plenty of photo galleries of the house, gardens and plantation as well.  And, like I mentioned before, they even have an online store where you can get plants, seeds or a replica artifact or two.

So as much as I would love to hop a plane and fly out and stay for the summer, instead I’ll be taking a virtual journey to Monticello today.  I’d love for you to join me!

And I almost forgot to mention, next week is Historic Garden Week (April 21 – 28) so if anyone would like to take me on a surprise trip, I’ll go!

Kate


March 9, 2012

Gearing up for starting seeds

“It’s 17 and sunny.”  the morning show host said brightly.  Did I hear him right?  Yikes!  Wasn’t it 55 yesterday?  No, wait, that was Tuesday, or was it Monday?  Oh, well.  Tomorrow is supposed to be in the 50s and looks like 60 is coming a couple of days after that.  But, basketball tournaments haven’t started yet so there’s still time for one more blizzard.

To some this may sound insane, but to those of us who live here, it’s simply called Minnesota.

Bright, sunny mornings make me smile and honestly, I prefer the 10 – 20 range more than the 20s and 30s.  Why? Because when we get into the 30s and get snow-melt the air is damp and as we say in Minnesota “it’s not the cold so much, it’s the dampness, it cuts right through ya”.  Despite the chill in the air I’m so excited to get the garden going.  In March?  Sure!  Okay, technically not outside, although you can sow seeds in snow, I’ve yet to experiment with that and this year is not the year to try considering we’ve been looking at brown grass far more than a white blanket of snow.

Snow or no snow though, it’s almost time to get seeds started inside.  Do you have everything you need?  A sunny window?  Plant Lights?  Seeds?  Seed trays?  Growing medium (soil)? Early March is a good time to get all of these things ready to go: plant lights set up, seeds ordered and delivered, garden calendar and garden journal ready.

Most warm season plants need to be started inside about 6-8 weeks prior to the average last frost.  In our area, that’s anytime between March 20th and April 3rd.  So if you haven’t gotten your supplies together, now’s the time to do it!

Seed catalogs typically start coming in the mail in January.  When they start filling my mailbox, my heart picks up a little speed, a smile crosses my face.  I immediately transport myself from a cold winter day to a warm sunny day in the middle of August, out in the garden with everything at its peak…. picking sun-ripened tomatoes, smelling the scent of basil and thyme as I brush against them on my stroll through the back yard.   And the raspberries!  Hanging there, just waiting to be plucked from their canes and popped into my mouth where the sweet burst of flavor sends tingles of happiness down to my toes.  But alas… it’s not August, it’s March.  But I can dream and so can you.  After all, it’s these dreams, these visions of perfection that get us in the spirit of gardening even when Mother Nature isn’t ready for us to play the soil just yet.

Back to seed catalogs.  If you haven’t ordered seeds… Do. It. NOW!  When perusing catalogs though and making those final decisions, there are a couple of things to keep in mind.  First, make sure the plants you select are suitable for your climate, and by climate, I mean cold hardiness zone.  Minnesota used to range from zone 4b in the south to 2b in the north, but in January 2012, they updated the USDA Plant Hardiness Zone Map to reflect recent temperature changes and shifted Minnesota into a slightly warmer zone.  Our new zones range from 5a in the south to 3a in the north.  So what does this mean?  The plant hardiness zone map is based on the average annual minimum winter temperature.  What does that mean for gardeners?  It’s a tool to help us determine which plants are most likely to thrive in our location.  When looking at seed catalogs, plant catalogs or plant tags in the nursery or garden center it should show the cold hardiness for each (perennial) plant.  For example, say I’m looking through the Seed Savers Exchange catalog (one of my favorites) and as I cruise through the description for “Oregano, Greek” – I see “Perennial in zones 4-9”.  If I live in northern Minnesota, in zone 3a, I think to myself, “nope, not a perennial here” but if I live in southern Minnesota, in zone 5a, I think, “hmm… maybe that’s why my oregano came through the winter last year”.

You typically won’t see a lot of cold hardiness information noted in fruit and vegetable seed catalogs.  Why?  Because the majority of these plants are annuals.  We plant them, grow them, harvest their fruit and they complete their life cycle all in one season.  However, perennial herbs, fruits and vegetables, perennial flowers, as well as trees and shrubs, will include cold hardiness information because they will continue living, growing and producing fruit year after year in the proper growing conditions.  What if you fall outside the perennial zones?  This doesn’t mean you shouldn’t take a shot at growing the plant, it just means you’ll need to think of it as an annual whereas other areas will think of it as a perennial.

The other thing to note, is if you will be growing the plant for its fruit, you want to make sure your climate has enough warm days during the growing season to allow the fruit to mature.  This will also be noted in the catalogs or on seed packets.  They will state “65 days to maturity”  or “75 days from transplant” (“transplant” signals that these need to be started from seed indoors prior to planting outside).  They may state “50 days”, they may state (with peas, for example) “Shell, 50-55 days” or they may state “Edible podded, 60 days”.  Basically what all of this means is that they need to have the number of days (shown on the package or in the catalog) during the growing season (average last frost in the spring until average first frost in the fall) to be able to produce fruit.  Keep in mind if you only have 75 days in your growing season you would be cutting it pretty close to not getting any fruit if you choose something in the 65+ range.  It would be a huge bummer to nurture a plant all summer to run out of warmth before you get fruit.

On to plant light stands.  If you don’t already have one, you can buy them ready-to-assemble or build your own.  Some plant light stands can be pretty darned expensive, I’ve seen them for as high as $800 for the mac daddy down to around $250 for a pretty basic structure.  However, you can build your own for just a little over $100 with hardware store materials and a little handiness.  Mine is built from PVC, which unless you like the look of white plastic in your house it’s not all that pretty, but the plants have yet to complain.

If you’ve never started seeds inside, I’d encourage you to try it.  It’s pretty fun, truly amazing to watch, can be disappointing at times, but be very rewarding and well worth the money you save versus buying transplants later in the season.  At the very least you get to say, “I grew that, from seed!”

The added bonus about starting your own plants from seed, is that if you want to eat local, organic food, there’s really no better way to know exactly where your food came from than to start with an organic seed, grow it in organic soil, provide water, sunlight and feed it with healthy, chemical-free fertilizer (a.k.a compost) until the day you harvest. It doesn’t get any more local or organic than this!

If haven’t tried seed starting and you’re not sure where to start, or if you have and ran into problems please give me a holler, leave a comment or drop me a line and I’d be happy to offer what I can to help you get things growing.

Kate