Archive for ‘Chickens’

April 3, 2013

“The Coop”

a-to-z-letters-c


If you are going to keep chickens, you must have a coop.  And if you’ve ever done research on coops I’m sure you’ve found that there are about as many coop designs out there as there are people who own chickens.  It can be a very overwhelming experience if you don’t know what the heck a chicken really needs.  Soon, you will realize that most coops are not designed for chickens, they are designed for people.

Selecting a coop

The chickens don’t really care where they live or what it looks like so long as they have the basic necessities; a nesting box, a roosting bar, ample space to move around and protection from predators and the elements.  Beyond that, all the bells and whistles are for the people, and our coop was no different.  After doing some research on the web, skimming about a dozen chicken books and visiting a few coops, I knew there were a few things I wanted in our coop.  I wanted to be able to walk into the space without ducking, bending over or whacking my head.  I wanted it to have easy access for both me and a wheel barrow for cleaning it out.  I wanted it to be predator-proof (we have two dogs, a cat the roams the neighborhood and back-up to a nature center full of wildlife including a pack of coyote).  Also, I didn’t want it to be an eyesore and I wanted it to be a little whimsical as well because, well, chickens don’t exactly strike me as the serious type.  In the end we decided practical ranked higher than whimsy so we selected the Wichita Cabin Coop for our design.  Not exactly whimsical, but I’m opting for paint to get my whimsy.

Wichita Cabin Coop

Wichita Cabin Coop

Selecting the site

When we were selecting a site for the coop we knew we wanted to use the existing fence for added protection from the elements,  I wanted to easily see the coop from the house in case of chicken drama, I didn’t want to travel too far from the house to the coop (especially in the winter), I wanted it out of the path of kid play (I didn’t want the chickens to be traumatized by the soccer balls blasting into the side of the coop or the run) and ideally, it would be close to the veggie garden and compost bin.  The chickens also need some sun, some shade, protection from wind and protection from wetness.

Our coop is sited so that the end of the coop with the run is closest to the house and the nest box end of the coop is farthest from the house so we can see the girls when they are outside.  The coop is visible from our kitchen, the dining room, the sunroom, the master bedroom and the master bathroom.  It is sited on the north side of our fence, which provides shade from the summer sun, but doesn’t protect them from NW winter winds.  Fortunately, we also have a 100-foot high, 15-foot wide spruce tree that is 5  feet from the coop which serves as a wind block.   They get morning sun from the East on the nest box end and late afternoon sun from the West on the run.

Selecting the color

A few years ago we built a shed in the back yard and wanting to conserve and utilize rain water, we put a metal roof on the shed.  We want to add a rain barrel to the chicken coop as well and therefore wanted to have the have a little uniformity with the shed so we chose to use the same roof.  Originally we were going to side the coop in cedar, the same siding as we put on the shed, but were extremely lucky and neighbors offered reclaimed wood for the project so we shifted gears and decided to paint it instead.  Well, that opened up a lot of room to play, only limited by the roof color.  I was excited because now I could add a little whimsy to the coop that I was hoping for.  Originally I was leaning toward a sage green or red, but our son really wanted “blue, the color of the sky”, so we agreed.  I figured, why stop there?  If we’re doing bright blue, why not lime green too?  And perhaps accent with a little tangerine.  Yes, our coop will definitely have color! (And when the snow melts I plan to add a little whimsy as well.)


The Coop (minus the window)

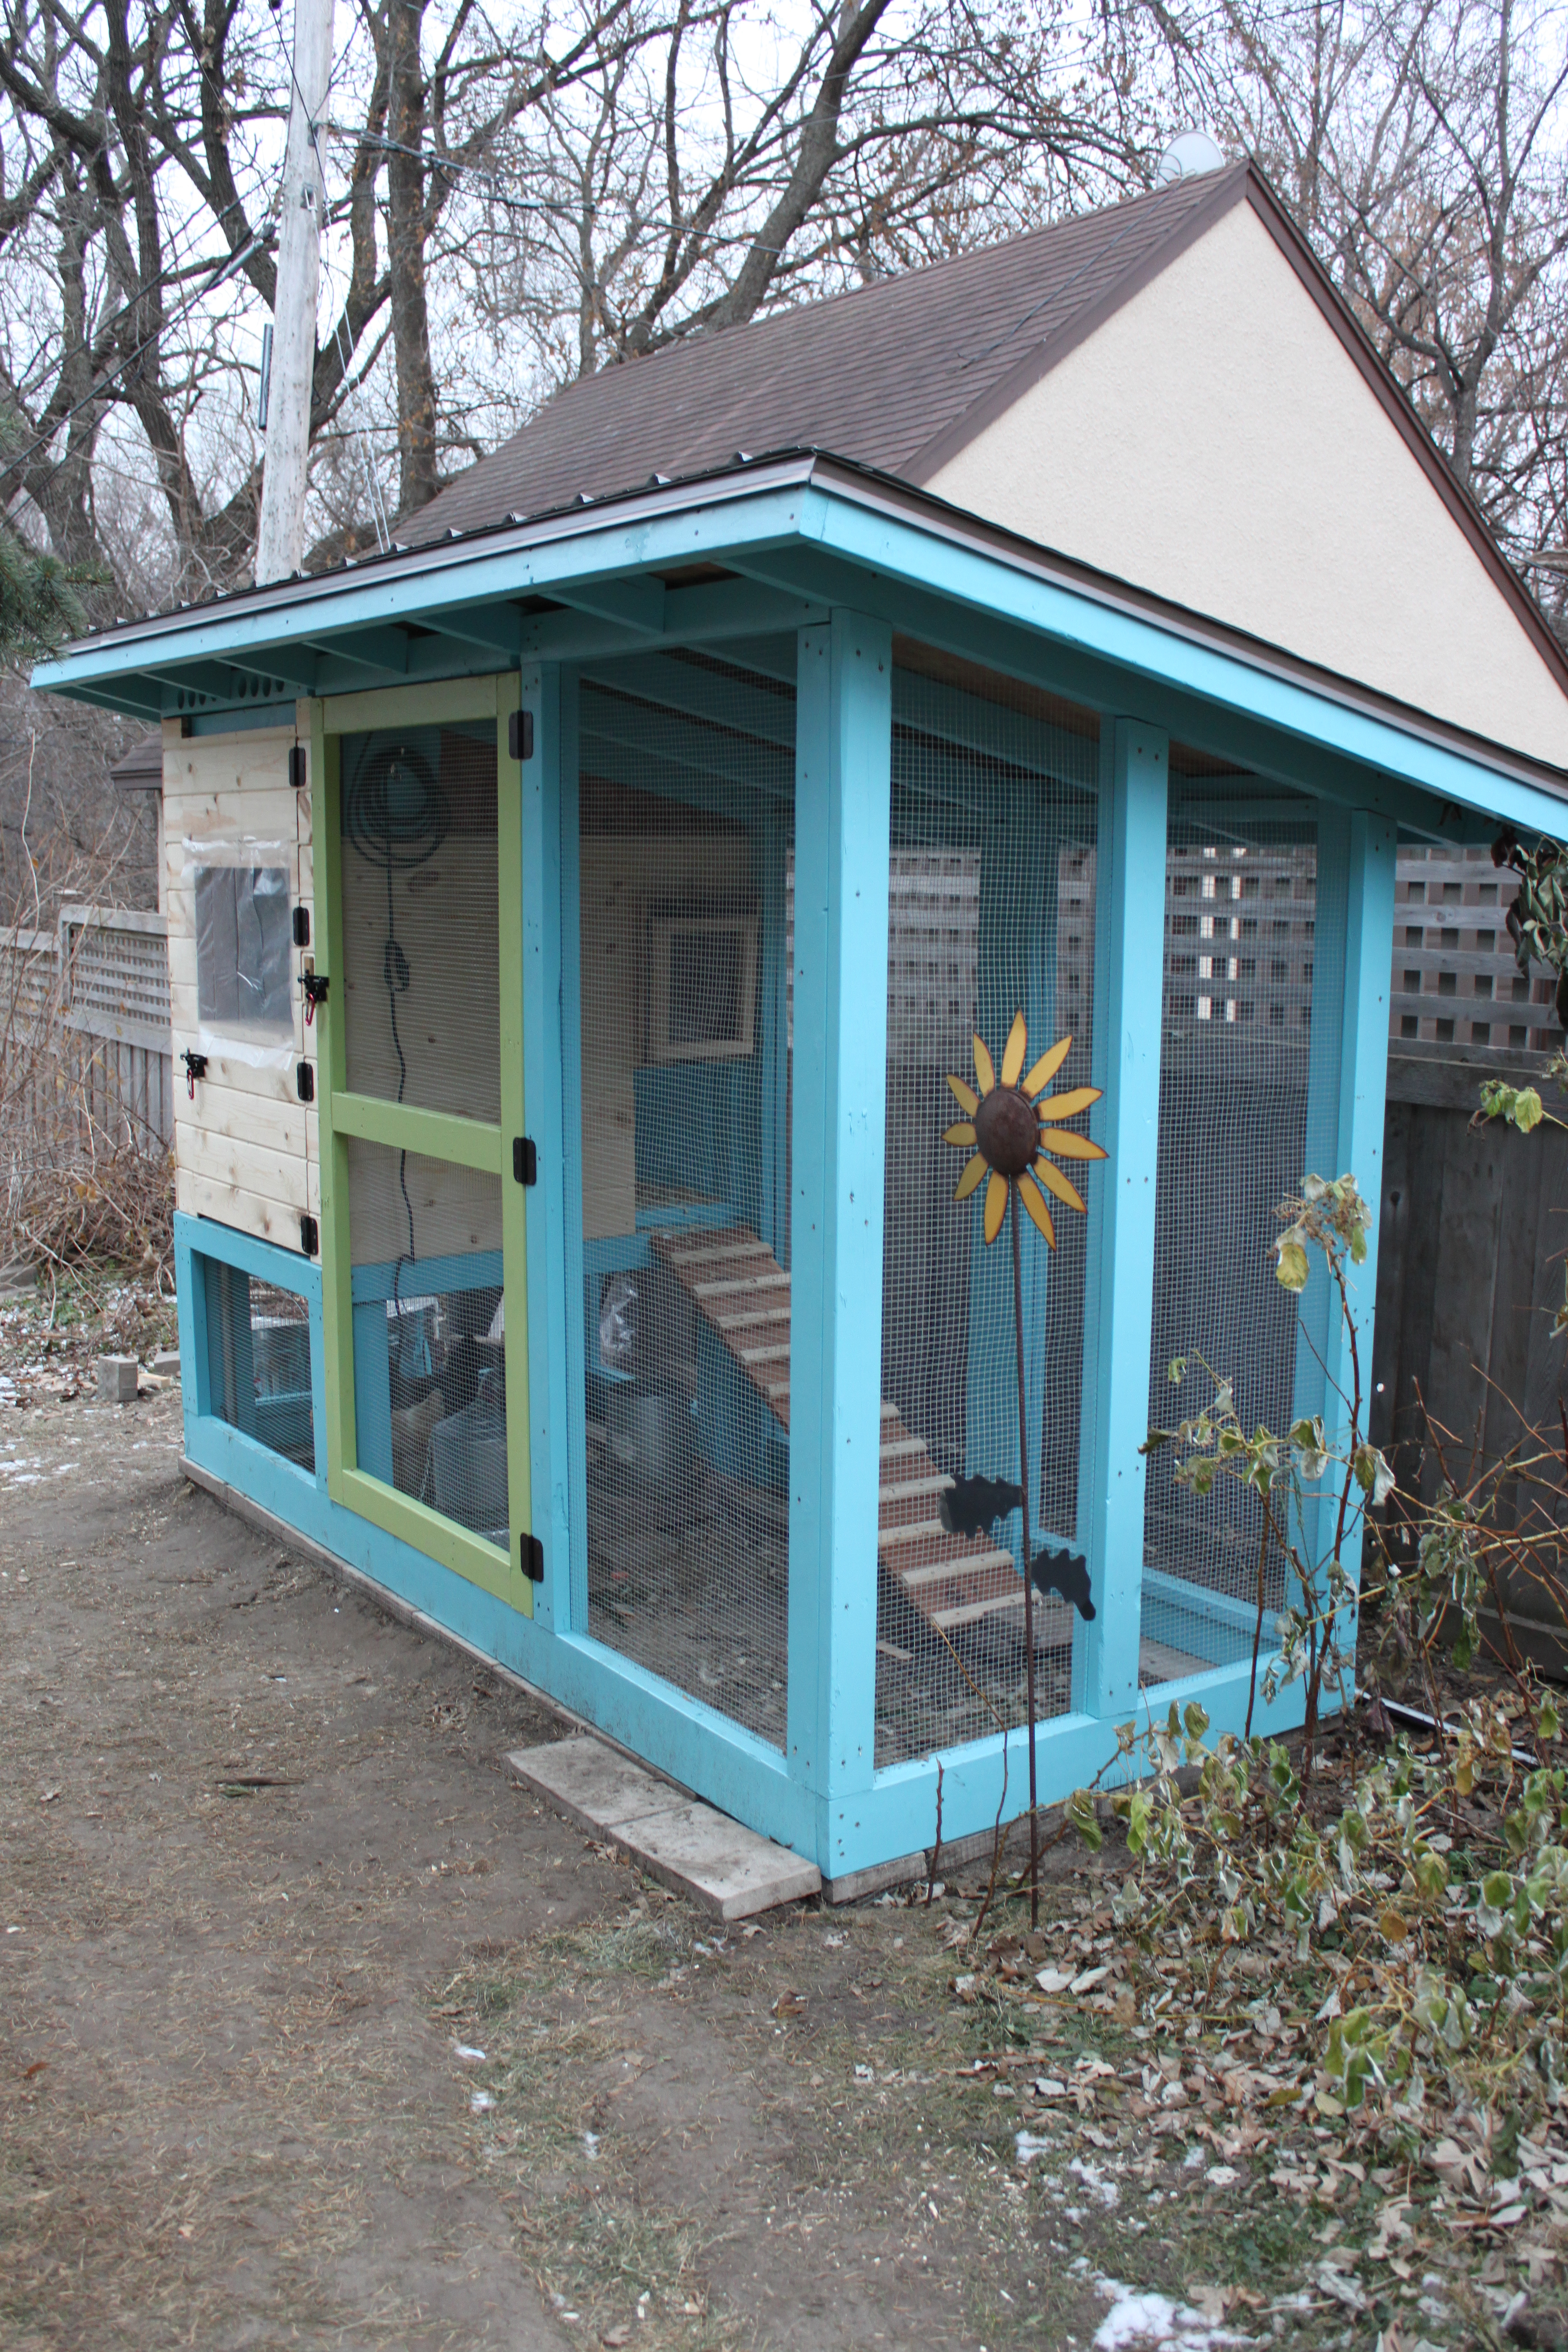
The Coop (minus the windows)

The Materials

Although chickens only cost a couple of dollars to buy, the coops can be downright expensive.  Granted, the smaller you go, the less expensive they are, but even so, if you are to buy a kit, they can still range anywhere from $300 to $3000 and more!   We were lucky.  As I mentioned, the majority of our lumber was given to us by our neighbors, so we had very little cost there.  We used old double hung windows in our shed and I wanted to stick with reclaimed windows again if we could, so we headed to Bauer Brothers Salvage and found a few gems there.  We bought the roofing, the siding, the hardware cloth, 2 gallons of blue paint/primer in one, a quart of the green paint/primer, hinges, screws, misc. hardware, patio stones, wire, conduit and a trenching shovel from Home Depot and Menards.

So that’s our coop, designed for us, with the girls in mind.  We’ve been very happy with the design.  I works well both for us humans and our feathered girls.  When the weather warms up I’ll finish the painting and add some other touches.  I’ll add more photos as the project progresses.

If you want the nitty-gritty details on how and what we did, let me know and I’ll put together a post on that as well.

Kate

March 20, 2013

16 Things to Do Now to Make it Feel Like Spring

It’s here!  It’s here!  Spring is here!

Yes, I know, you wouldn’t know it if you were to walk out your front door in Minnesota today.  In fact, you might think it were the middle of January.  I awoke this morning to the weather update of wah-wah, wah-wah, wah, wah with an -18 degree windchill.  Yikes!

If you look at Facebook at all today you’ll see a lot of whining, particularly here in Minnesota.  Unfortunately all of the meteorologists have been touting the weather we had this week last year at 70 and 80 degrees above zero making all of the complaining even worse.  The problem is, last year was NOT THE NORM.  The norm this time of the year in Minnesota is 35 to 40 degrees, which while a high of 18 today isn’t exactly tropical, if you compare it to being 20 degrees off the norm instead of 60 degrees off a record, it’s a little easier to chew.

Weather aside, or maybe because of the weather, I thought it was about time we all got excited for spring so I came up with a few things you can do to get by until the weather catches up with our eagerness.  Some of these things are specific to the Twin Cities area, but similar events are happening across the country.

  1. Force branches. Cut branches off of spring blooming trees and shrubs that need pruning, bring them in and put them in water.  In a few days you’ll have spring inside regardless of the weather outside. Learn more about which kinds of trees and shrubs and how-to here.
  2. Plant an indoor bulb garden.  Many nurseries and garden centers are now carrying bulb gardens that you can watch grow, or better yet, buy bulbs and make your own.
  3. Plan your garden.  Grab plans, pictures and notes from your garden journal and plot out your plan for this season.
  4. Build a plant stand with grow lights and start seeds indoors.
  5. Plant edible spring planters.
  6. Buy yourself some cut flowers.  It doesn’t have to be expensive, even $5 can bring a nice burst of color and a smile to your face.
  7. Go to a flower show.  Macy’s Flower Show is traveling the country.  Check here to see when they’ll be in a city near you.
  8. Make a fairy garden. Need inspiration?  The MN Landscape Arboretum is hosting Tiny Treasures: Fairies and Gnomes through March 31st.
  9. Visit a Farmer’s Market!  This Saturday, March 23, 2013, the Bachman’s on Lyndale will be hosting Fresh From the Freeze the Kingfield and Fulton Farmers Markets in the Greenhouse from 9am – 2pm.  There will be music, entertainment, beer, wine and hard cider too.  A vendor list is posted on their site.
  10. Looking to add some spring to your home?  Check out the Bachman’s Spring Ideas House 2013 from April 4th – April 28th.
  11. Visit the Como Park Conservatory. Can’t get there?  Check out the 360 degree view of The Sunken Gardens and The Palm Dome.
  12. Get baby chicks! Our chickens have brought so much sunshine and joy to some of the coldest days.  Egg|Plant Urban Farm Supply has chicks arriving on a weekly basis.  Order yours now. (I also know of a possible source if you’re local, contact me and I’ll connect you.) You can build your coop while they grow!  Not ready for your own?  Stop by and visit them.
  13. Start a windowsill garden.
  14. Plant grass in egg shells or a basket.  You’ll be ready for Easter.
  15. Take a trip down South.  No, actually I don’t mean on a plane or in a car.  Grab your jacket, don your hat, slip on those boots and head to the South side of your house, apartment building, what have you.  The South side of buildings gets the best sun and typically retains heat making that area a little micro-climate where the ground thaws early and plants emerge first.  A friend told me just yesterday that her tulips are “up” (poking through the ground) on the South side of her house.  Take a trip and report back on what you find!
  16. Feed the birds!  According to the birds spring is definitely here.  Don’t believe me?  Shut everything off, radio, TV, your kids 😉 and listen.  The birds a singing their sweet little heads off.  Want to hear them more clearly?  Hang a feeder in your yard (or fill-up that empty one), they’ll be singing songs of glory for you!

If all else fails, call me!  I’d be happy to chat about and help you plan your yard and garden for the upcoming season!

Happy Spring everyone!

Kate

January 8, 2013

Oh, poop! (How to Give a Chicken a Bath)

Ahhhhhh, yeah. The girl whose top fear about getting chickens was dealing with poop, has met her nemesis. Chicken poop.

Before getting chickens, I’d heard they poop a lot. And they definitely do, but not as much as my imagination had led me to believe. I envisioned chicken poop everywhere, on every surface in the coop, in the run, in the nest box, on the roosting bar, in their food, in their water, on the walls, in my hair, on my clothes, in-between my toes… Somehow, through all of that, I failed to imagine poop sticking to their feathers. Seriously? How did I not think of this one?

So a couple of days ago I went out to the coop to have one of my daily visits with the girls, as I sat perched on the edge of the door frame we chatted away. I asked how their day was going, told them about mine and they mm-bawwk-bawwk-baaaaawwwkked in return. We had quite a nice conversation while they dined on the apple core treats I’d brought for them. When they were finished and our conversation was winding down they turned to get into a single file line and march back up their ladder into their coop for a little rest. I always love watching them walk away because, frankly, chickens have really cute butts.

Zydeco (the hawk looking chicken) has very cool tail feathers and Billina and Jolene have the cutest fluffy butts, or at least they normally do. That day, Zydeco went first, marching her way up the ladder with her tail feathers following at attention, followed by Jolene, strutting in the fancy-pants way that she does. Then Billina whipped around to follow, only something was following her… something was stuck to her fluffy butt. “What on earth?!” I thought to myself, “What the…. Oh,no!” You can imagine the horror I felt when I realized that Billina had big glob of poop stuck to her feathers. “No! No, no, no. That can’t be. Uh, uh. No…”

“Great. Now what?” I remember reading that baby chicks will occasionally have that happen and all you have to do is get a wet paper towel and wipe it off. But baby chicks are little and this chicken and her poop are not. Much as I hoped it would, I knew no wet paper towel was going to fix this mess. So I watched the girls go into the coop, then turned away and walked back to the house, trying to pretend I never saw it, but I couldn’t.

“Maybe she’ll clean it up herself.” I thought to myself, knowing full well that would be nearly impossible. “Maybe it will fall off.” Sure, it’s 10 degrees outside, that’s not going to “just fall off” any time soon. Nope. In my gut I knew I was going to have to deal with it. The rest of the day I couldn’t get it out of my head. That afternoon, my son went out to check for eggs. He came running back into the house and said, “Mom…. This isn’t good…” I know he expected me to be surprised, but unfortunately I already knew what was coming. “…Billina has a big bunch of poop stuck to her butt.” “Uh, yep, honey. I know.” was all I could muster up in response. He started drilling me with questions as to how we were going to get it off. “I have no idea.” I mumbled.

Then it dawned on me. “Can you give a chicken a bath?” I mean chickens usually give themselves dust baths, and I’ve never seen a chicken swim. I wasn’t even sure if they were supposed to get wet. Everything I’d heard told me water and chickens don’t mix and coops need to be dry. So I did what any other good Chicken-Mom would do. I Googled it… “how to clean poo off a hen’s bottom in winter”.

Much to my relief (and disappointment) I found it! Sure enough. You can give a chicken a bath! (And someone had posted detailed instructions as to how to go about doing it here.) Okay, that was solved. I need to give Billina a bath. That should be fun. So I waited another day, okay maybe it was two or three. I kept hoping and praying this problem would take care of itself (I’d read that it could), but instead things just kept piling up on her rear end.

Oh, poop!

Oh, poop!

Then I panicked, my thoughts running a muck. “What if she can’t lay eggs?!? None of them laid eggs today! They do EVERYTHING out of the same spot (the vent). What if I don’t take care of this? She could get all clogged up and DIE and it would be all my fault!” Thankfully, she laid an egg about an hour after my chicken-death thought so I still had time to plan. After stalling long enough, I knew it wasn’t going to resolve itself and finally got up the nerve to give the girl a bath.

According to Tilly’s Nest it’s supposed to go pretty smoothly. Here’s how it went for me:

Tilly’s Nest: Create a washing station.

  • Me: Check.

Tilly’s Nest: Once you catch the chicken, while holding your hands over the wings, loosely wrap their head and upper body in a dry towel.

Ready for her bath!

Ready for her bath!

Me: Go out to coop with a bath towel and pick-up chicken by holding her wings in. Proudly come back to house with towel over her back and tail leaving her head and neck fully exposed. But I got her. Check.

Tilly’s Nest: Place the chicken in the bin with soapy water. Cup some water with your hand and wet the soiled area. Yes, there really are not too many feathers there once wet. You will then be able to loosen to poop off the affected feathers by rubbing each feather between your fingers. Be careful not to pull the feathers. Also, clean the feathers very well around the vent. This may take some time. Once satisfied, transfer the chicken to the rinsing bowl and try to remove as much soapy water and remaining poop from your bird.

Washing feathers

Washing feathers

  • Me: Attempt to remove the worst of the poo with a paper towel and realize it’s a frozen glob. Place chicken in the wash tub with soapy water. Cup water with hand and splash at chicken’s butt. Stare at poop, willing it to fall off into the water. When that doesn’t happen, splash more water at chicken’s butt. Repeat 25 times so you don’t have to touch poop. Give up and grab scrub brush to “gently loosen poop from feathers” without ripping them out of her butt. Once all signs of poop are gone, run fingers through feathers to make sure they are clean. Check.

Tilly’s Nest: Once rinsed, squeeze the excess water out with your hands and then towel dry your chicken.

  • Me: Completely forget about squeezing excess water. Beg for assistance to take soaking wet towel off of chicken and put dry towel on. Make sure she’s still alive. She’s too quiet. Husband swaps towels and chicken is alive. Check.

Tilly’s Nest: Now, move over to the drying station. On the lowest heat setting and speed begin to dry your chicken. Keep the dryer constantly moving and continually fluff the feathers as you dry with your free hand. After about 5 minutes, poof, your chicken’s beautiful fluffy butt will return.

Getting a blow dry!

Getting a blow dry!

Fluffy butt returns!

Finally – Her fluffy butt returns!

  • Me: Move to drying station (towel on floor with hairdryer nearby). Have husband hold chicken while fluffing feathers with one hand and holding hairdryer with the other. Question how many hands “Tilly” has. After about 45 minutes, poof, Billina’s fluffy butt returns! Be in pure amazement as to how “good” she was and how much she must have liked it. Check.
Happy chicken...

Clean, dry, happy chicken…

  • Carry chicken upstairs to give her a treat. As she snubs pears and acts like she can’t see them, panic briefly thinking you got soap in her eyes and made her go blind. Realize she’s not blind and wasn’t being “good”, she was terrified…
Three fluffy butts!

Three fluffy butts!

  • Return chicken to her coop to be with the other girls. Pat yourself on the back for giving a chicken a bath. Go in and wash out sink. Wash hands five times. Check and check.

So there you have it. One of my worst fears about chickens came true and I not only survived, but did just fine.

Conquer another fear. Check.

Kate

This post was shared at:
Homestead Barn Hop

December 20, 2012

And Now for the Chickens!

On the third day of Christmas da, da, da, da, da, da… three French hens, two turtle doves, and a partridge in a pear tree…  Scratch that.  We have three hens, but our hens are not French.  We also don’t have two turtle doves, but we do have two dogs, oh, but no partridge, just a cat.  But we do have a pear tree!  Two actually. Oh, and did you know that Partridge is a type of chicken.  I don’t have one, but discovered it the other day.  I love tidbits of information like that.  But you’re not here for that…

Back to the chickens.  As I said, we have three hens, but they are not French.  One is English, one is American and the other is probably American, no definitely American.  Anyway, as you may recall, we adopted “the girls” from a friend-of-a-friend of my Dad’s about a month ago.  They are all about a year and a half old, born around Memorial Day of 2011.  The girls, having had previous owners, already had names.  Jolene, Billina and Zydeco.  Although we contemplated renaming them, we really couldn’t come up with any names that seemed to make them worth changing.  I mean Souffle, Omelet and Scramble just didn’t seem right and besides these are chickens, hens if you will, so giving them egg names didn’t seem appropriate.  We came up with some other names too, but nothing really stuck so we decided to keep them as is.  Plus, all of our other animals were named before we adopted them and we kept those names, to honor their history in a way, so we thought we should do the same for the chickens.  I should clarify, when I say “we”, it’s mostly me, having conversations with myself, running it past the rest of the family for their input to which I usually get head nods and “sure” as a response, hence “we”.

And Now for the Chickens!

Jolene

Jolene

 First up is Jolene, named after the Dolly Parton song.  Jolene is a Buff Orpington, a breed originating from England. Jolene is at the top of the pecking order in our coop (both literally and figuratively).  She also got a bit stressed when she first moved in (hence the feathers missing from her chest in the picture above).  Jolene makes me laugh.  She’s curious, and the most trusting of me so far.  We think she was the first to lay an egg for us too but we can’t be certain because two of them lay brown eggs, she’s one of them.  Jolene really likes treats.  She prefers apples and carrots and attempts to eat an occasional finger if you don’t bring her treats.

Billina

Billina

Next up is Billina, a Silver Laced Wyandotte, an American breed developed in New York State, in the early 1870s.  Billina is named after the chicken in the Wizard of Oz books, specifically Ozma of Oz.  (I’ve never read it, but now need to.)  Billina is a bit of a funny girl.  She’s the quietest of all of them thus far.  She’s observant, confident, yet not the first to check anything out.  She’s always the last to come out in the morning and last to go in at night.  Billina also lays brown eggs.

Zydeco

Zydeco

And last but not least, Zydeco.  Zydeco is an Ameraucana, also known as an Easter Egger, an American Breed known for laying light blue, green or pinkish-brown eggs.  Although the previous owner wasn’t positive of the reason for her name (she shared ownership of the chickens with two others), Zydeco is a mixed genre of music (which I happen to like) found in Louisiana combining Cajun, Blues and Rythym and Blues.   Zydeco has yet to lay any eggs since moving to our place, but we saw proof at her previous home that she lays green eggs.  Zydeco is pretty cool.  I love her tail!  She’s a curious, but cautious girl so far, she still scampers a little when I go near her too.  Oh, and I think she might be the smartest of the girls too.  I swear she knows her name, more than once she’s turned and looked at me when I’ve said it.

The girls arrived a little over four weeks ago and just started laying eggs on December 12th (easy to remember 12-12-12).  At first it was one egg per day, then there were two, then one, then two.  We are still anxiously awaiting a day where we get three and that one of them will be green (which would mean Zydeco is finally laying).

First eggs from the girls!

First eggs from the girls!

As of right now, we have 11 eggs from the girls. You’ll notice a “J” and a “B” on the eggs above, there was a lot of squawking in the coop the other day.  Jolene made a big stink every time someone laid an egg so I happened to know which chicken laid which egg.  Just to clarify any confusion, the eggs did not come out with their initials on them (as my son briefly thought) I marked them to see if we could determine who laid the others.

You might wonder why we haven’t eaten any eggs yet.  Well, I’ve been saving them up to make custard pie.  Now I have plenty for a pie or two and some other treats.  Seriously can’t wait!  Oh, and yes, now I will start eating them for breakfast too.

Kate